Even in ancient times, wickerwork (chairs, boxes, various baskets) made of willow vine were found at excavations, which means that this craft can be considered to have originated from those times. In later centuries, the craft developed and weaving from this same vine began to be much more diverse; more precisely, they began to weave all sorts of pieces of furniture, products needed in everyday life, things for interior decoration, and various weaving patterns were invented. Those who want to learn how to weave wicker with their own hands should read step-by-step master class on weaving willow baskets for beginners.
In Russia, with the development of railway construction, wicker weaving also developed, mainly woven containers (boxes) for packaging transported goods. In the 20th century, entire factories were built with large areas of willow, making baskets, furniture and much more. At all times, people wanted to bring something natural into the house, which is why wicker products made from natural materials were so valued; it is believed that objects woven from natural wicker have their own favorable energy, which contributes to the creation of a cozy and harmonious home.
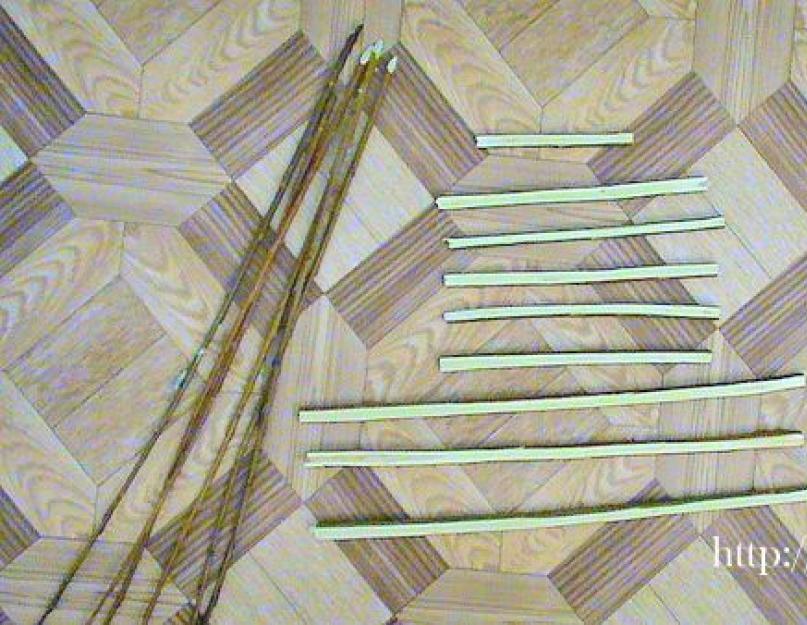
Before you start weaving, of course, you need to prepare the tools and material for weaving; preparing the material takes quite a lot of time. It is necessary to cut a large number of twigs from the vine, but not all of them, but only young shoots that can bend and not crack when bent, and remove the bark from them. If it is impossible to remove the bark, you will have to do another operation. The willow vine should be soaked, steamed or boiled in water. After all this, it is necessary to dry the material. But many now just want to do weaving, so they buy already prepared willow twigs, although it is more useful for beginners to learn how to prepare the twigs themselves, this will help in their work. It is also useful for beginners to weave more and more in order to feel the flexibility of the vine, and then during weaving there will be fewer rods breaking.
Weaving technology
This cute basket can be used both in the garden and in the forest, having only mastered the technology of weaving willow baskets. It is convenient to put the harvest of vegetables, fruits, berries or mushrooms in an oval-shaped basket; moreover, the air in it is well ventilated, which is useful for food, including on a picnic.
Before the work itself, be sure to soak a certain amount of vine, with a reserve, in water or wrap it in a wet rag so that the rods become flexible and do not crack during bending.
The weaving of the bottom must be made in the shape of an oval; for this you will need to form a cross shape from pieces of rods 4-7 mm thick: 1 rod with a length of at least 6 cm, 5 pcs. length at least 13 cm, 3 pcs. – 25 cm. Although, if you want to weave a larger basket, the rods can be taken longer and the quantity will therefore need to be increased.

First, you need to take the longest sticks and split them in the middle with a knife and an awl; this operation must be done carefully so as not to split the stick completely. Smaller sticks are inserted into the crack, distributed at a distance of 3-4 cm from each other and fastened for a tight fit with a thin rod, which braids the combined sticks crosswise. The shortest stick is also inserted from either side into the crack.


Now we begin to braid the cross with thin rods in the simplest way, threading the rod either from above the beam of the cross, or from below. You can also secure the braiding rod in a crack. During weaving, it is necessary to move apart the rods that are close to each other so that the distance between the axes of the base is made more or less equal.

The extension of the rod occurs as follows; it must be hidden between the already woven rows.

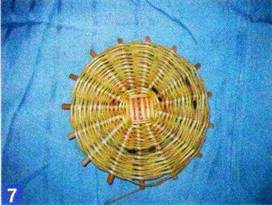
You need to weave enough rows so that the bottom is 15 cm by 25 cm in size. If the ends of the beams of the cross are still visible, they must be cut off.

Now, to create the future ribs of the basket, you need to insert rods similar in thickness (about 5 mm) to the cross rods, sharpening the ends for ease of insertion between the rows. The distance between the ribs must be made the same.

It is also necessary to weave several rows in order to weave the bottom of the basket to the required size (30 by 40 cm).

The edge of the bottom can be braided with a “rope” pattern, i.e. you need to take two twigs and braid them, putting one on top of the ray, the other under the ray, moving on to the next ray, changing places, the twig that was under the ray braids on top of the ray, and the one that was above braids on the bottom. You can take two twigs on each side, the braid will look more expressive.

How to weave the walls of a basket after the bottom? The ribs must be bent into a vertical position, fastening everything together. For spacers, you can use a metal circle larger than the bottom of the basket itself. You can secure the spacer with wire to the ribs so that it does not move or fall.


The weaving continues on the walls of the basket, in the same way as the bottom was braided, reaching the spacer with weaving, it can be removed, because the shape will already be formed and the ribs will not fall apart. The ends of the twigs can be brought out to the front side, at the end of the work they will be cut off, or for greater accuracy they can be hidden inside, from the back.

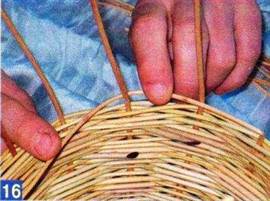
The basket is woven to approximately a height of 25 cm, and then the upper edge is braided: a rib is taken and the second and third rib are bent, the end is cut off and inserted behind the third rib inside between the rows of the wall to a depth of 6-7 cm.

A couple of ribs should not be cut off, but left for the handle of the basket.

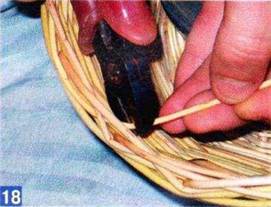
The weaving of the handle must be reinforced with a thicker rod, which must first be twisted, and the ends of the rod must be sharpened so that it can be easily inserted into the rows of the wall.


And now the rod is braided with 5-6 thin rods, also inserted into the gap between the rows of the wall; the same action must be done on the other side of the handle with another 5-6 thin rods. The ends of the rods, brought out, must be wrapped around the handle, so to speak, braided and secured.


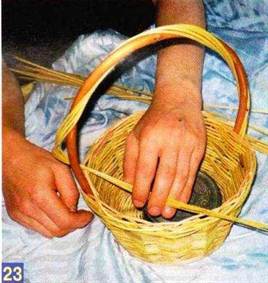
For a better fit of the rods, the handles can be tied with twine, tightening it forcefully. The twine can be removed when the vine dries and takes the desired shape.

The ends of all the twigs are cut around the entire perimeter of the basket and it will be finally ready for use when it dries.


Video on the topic of the article
The video tutorials are selected according to the topic of the article to help beginner weavers.
Wicker products made from willow have been used by our ancestors since ancient times. Today, not only willow baskets are popular, but also all kinds of chests, candy bowls, trays, decorative elements and even furniture. There are entire wicker factories for the production of wicker products. All items made from natural raw materials are environmentally friendly, which is so important in our time.
Since vine products are made by hand, their cost is significantly different from non-living ones. plastic products. And since weaving wicker products is largely a manual process, why not try to make such a product yourself, thereby saving money. Moreover, the technique of weaving willow baskets with your own hands has a centuries-old history, is passed on from generation to generation, and anyone can master it.
Features of wicker weaving
Wicker weaving has an incredibly long history. However, little has changed in the weaving technique and basic operating principles. The most popular material in wicker weaving is willow. The technology is incredibly simple; prepared rods are woven together in a certain way, thereby creating the necessary item.
To master this craft, it is important to know the main aspects:
- What material is best to weave wicker products from and how to prepare it for work?
- What tools are useful in the process of creating a wicker product?
- What are the main weaving techniques and which one is best suited to a specific type of product?
In the process of studying this topic, you will find answers to all these questions and make sure that you are able to master this type of craft. It's important to remember that, like any other craft, practice is key. Therefore, before you start working, it’s worth practicing a little in various weaving techniques, watching lessons on making the elements of the product you need, and learning about the tricks and subtleties that craftsmen use.
Important! Before creating a full-fledged product, it would not be amiss to weave several blanks, try to work with willow twigs, feel how they lend themselves to weaving, and learn to distinguish the flexibility of the vine. Perhaps at this stage you will get a feel for some of the features of working with the material and make certain adjustments to the stage of preparing the raw materials.
Preparation of necessary materials and tools
In order for the whole process to go quickly and without complications, you need to prepare in advance. This applies to both basic raw materials and tools.
Willow twigs
In order to weave a willow basket with your own hands, you need to familiarize yourself with what material is best to use for these purposes. As you might have guessed, the main raw material for weaving baskets is willow twigs.
There are two options where you can get them:
- Purchase from a specialized online store.
- Collect them yourself or prepare them.
If in the first option everything is extremely clear, then in the second it is worth going into more detail. It is important to know which rods are most suitable for weaving. Here are the basic requirements that they must meet:
- if you try to bend a wicker rod 180 degrees, it should not crack or break;
- It is best to use those rods that are orange or red in color;
- willow shoots must be cut off either before flowering begins, which occurs in May, or already in August, because by that time fresh branches will have grown noticeably;
- the most suitable twigs for weaving are best cut from willow trees growing on sandy soil;
- the rods should have a small core.

When you have collected a sufficient amount of high-quality raw materials, you should begin processing it for further successful work:
- Experienced craftsmen advise first removing the bark from the vine, since not all products look good with it.
- If the bark is difficult to remove, then experts advise boiling the rods. They must be placed in a container of the required size and boiled for 2 hours. The container should be large so that the rods are subject to minimal twisting. Next, you should cool them and remove the bark from them. This should be done while the branches are still wet.
Important! If you have a large number of pieces, it is better to leave them in water and gradually remove the bark from them. It must be removed moving from the thick edge.
- After removing the bark, you should begin the drying process. It is best to dry the branches outdoors, avoiding direct sunlight. Typically the drying process takes about 5 days. Masters advise already at this stage to sort the branches according to their length and size - this will make the weaving process easier.
At this point, the process of preparing the willow vine can be considered complete.
Tools for work
Beginners should start weaving a willow basket with their own hands by preparing the following tools necessary for the work:
- a sharp knife, large scissors or garden pruners, with which you will cut off the excess length of the rods and make cuts;
- pliers to make it easier to twist and pull out the vine;
- an awl for threading vines;
- clamps or clothespins that can be used to secure part of the vine;
- a long, comfortable ruler - preferably made of metal, and a simple pencil;
- large capacity for pre-steaming rods before starting work.
As you can see, the preparation process is quite simple, and the weaving itself does not require any special or intricate devices.
Work progress when weaving a simple willow basket
If you decide to start working, then you should know that it is best to work with pre-soaked rods. To do this, they need to be placed in a large container and filled with hot water. After 15-20 minutes they will be suitable for work, they will become more flexible and pliable.
Important! Another important point: during the weaving process, periodically spray the rods with water, not allowing them to dry.
Weaving the bottom
The very first thing to start the weaving process is to create the bottom of the product. For this:
- Prepare 8 rods of medium thickness - this amount is optimal for the classic and most popular weaving. Make cuts in four of the rods and insert the remaining four through all of them.
- Next, take two thin vines and insert one of them under the four rods in the slot, and insert the other above the four rods into the slot.
- Then braid them into 4 rods, starting them alternately from below, then from above, towards each other.
- When you have braided one row, begin to bend one main rod at a time and braid them with a thin vine so that one of them goes from above, the other from below the rod. In front of you there should be a wheel of 16 branches, in the form of rays. At this stage it is worth adding another branch, simply insert it between the two protruding rays under the braid, sharpening the end.
- Continue weaving the bottom using the same technique. In this way, the bottom is braided until it reaches the desired diameter.
Important! If in the process of weaving a willow basket with your own hands you run out of thin vine, you should take a new one, insert it under the previous row and trim off the unnecessary remaining piece.

Creating a transition to the walls and forming the walls themselves
When you have the bottom of the desired size ready, you should start creating the transition to the sides of the basket. For this:
- Take 17 new vine branches and insert them under the braid, close to the already protruding rays.
- In order for them to fit well under the braid, you sharpen them with a knife and push them inside with an awl.
- Bend the newly inserted 16 rods upward, forming the sides of the basket.
- You cut off the unnecessary old protruding ends so that they do not stick out, and thread 17 rods under two new racks and bring them to the top.
- Do the same with subsequent new rays until you go around everything in a circle.
- Next, you braid the sides of the basket using your chosen technique. You need to weave until you reach the desired height of the basket.
Weaving edges and handles
In order to make the edge of the basket, you need to take one edge and wrap it around the second and third, bringing it out so that its edge is hidden inside, between the top rows. The unnecessary piece should be cut off. Do this with all the rays.
People have been weaving from vines since ancient times, only at first they wove from grapevines, which is why the name came about - weaving baskets from high-quality vines, although you can use twigs and other plants (raspberries, blackberries, currants) for weaving, which will be more pliable for beginners. Then man found a more flexible and durable plant - willow. Willow twigs are flexible and do not break like a vine, so large objects, furniture (sofas, tables, shelves, bookcases, chairs), as well as smaller products, boxes, baskets, bread bins, dishes, vases, figurines are woven from it. , photo frames and much more, for which only your imagination is enough.
Many saw wickerwork and some of them also wanted to get such a household item for their own use. Therefore, the question often arises about how to weave large and small baskets from wicker. Weaving it with your own hands is possible and not at all difficult, you just need to stock up on time, patience and materials for weaving.
Photo lesson on weaving baskets from wicker for beginners
Preparation
For beginners in wicker weaving, it will be more useful to prepare the material yourself, i.e. It is necessary to cut one-year-old twigs in large quantities and with a reserve, because for beginners twigs break more often during work. You need to cut off thin twigs with a sharp knife or pruning shears, leaving 3-4 more buds on the branch so that the branch can continue to grow.
Before cutting a large number of vines from a certain bush, you need to check the flexibility of the first cut branch, i.e. you need to bend it in half from the thick end, if it is not cracked, it means it fits and you can cut it further.
To ensure that the vine in the finished product does not change color, it should be soaked, preferably in running water (up to 1 month), steamed in hot water (1-2 hours) or boiled in boiling water (up to 20 minutes), peeled from the bark, and then dry it on a flat surface so that the color is uniform and without stains. Before work itself, the vine should again be soaked in water or wrapped in a wet rag and bag to again give it the flexibility so necessary during weaving.
Material and tools
Material required for the basket: 8 rods for the bottom cross, 7 mm in diameter and 20-25 cm long, for the rigidity of the walls - 15 rods 25-30 cm long, and 5-7 mm in diameter, for braiding - 20-30 pieces of vine thickness in diameter no more than 4-5 mm, and length up to 1 meter.
Tools that will be needed during work: knife, round nose pliers, pliers, side cutters, awls of different diameters, incl. and a thick curved awl (kochedyk), a weight to hold the work in place and elastic bands or rope.
Weaving bottom
Basket weaving starts from the bottom. You need to take 8 thick rods approximately in length, make a cut in 4 of them, i.e. you need to split it in the middle with a knife or an awl, then insert 4 more rods, so you get a cross bottom.

The braiding of the crosspiece begins with the “rope” technique, the thin ends of two rods are hidden in a crack in the crosspiece, then the rods are separated and one goes above the axes of the crosspiece, the other under the axes, then they change places and so one or two rows pass in a circle.

Then the axes of the cross are divided into two and braided further.

Then you need to make an odd number of rays of the cross, because This is necessary for simple weaving; one of the rods is cut with a side cutter. The rods are moved further apart and the angles between them are made equal so that the bottom is round and the weaving is uniform.

So the weaving continues until the entire length of the rays is braided, the excess ends are cut off.
Basket walls
The next step is to attach 15 side posts into the weave bottom.

It is necessary to bend these posts 90 degrees, set them in a vertical position and tie the upper ends of the posts together with an elastic band or rope.

The border between the bottom and the walls of the basket is then braided with three rods. You need to take three pieces of vines and insert them into the bottom with thin ends near each of the three successively located racks.


The leftmost twig goes around the outside of two posts to the right, goes behind the third post inside and comes out outside near the fourth post. In the same sequence, 2 other twigs of the vine are braided. This is how several rows (2-3 pieces) of braids are woven (the border between the bottom and the walls of the basket) to form a shape.


The weaving of the walls occurs using the usual weaving method, i.e. one rod is behind the counter, the other is in front of the counter.


Basket handle
It is necessary to take a thick rod of the required length and bend it into the shape that the finished handle should look like, sharpen the ends and insert it into the weaving of the wall on both sides.


6 thin rods 2-3 mm thick are inserted next to the thick rod, they are braided around the handle, and if necessary, they are fastened with tape.


The main thing is to soak...
Let's start. The best raw material for weaving baskets is willow shoots. I cut them in May, before the tree begins to bloom, or in August, when new branches grow long enough. I immediately remove the bark from the cut twigs and then leave them for at least five days in the shade in the open air.
I weave the bottom and edges of the basket with whole and round rods, and the walls with split rods into two, three or four parts.
To do this, I cut a special stake from hard wood (apple or pear) (Fig. 1). To split the rod into three, I make 1.5-2 cm long cuts at its end with a sharp knife. Then I insert a peg into them, carefully moving it along the core of the rod.
I remove the brown core from the split rods. To do this, I soak them in water for about 3 hours, and then process them with a plane made of a wooden beam and a specially made blade (Fig. 2). The distance between these parts is 2 mm. Before starting work, the rods must be wet, so before weaving, I put them in water again, but for only 2-3 minutes.
...and not get confused
The bottom of the basket is formed like this. I split five rods in the middle with a knife and drag five others through them. Into the same split I insert the ends of the first two round and long rods for braiding the bottom (Fig. 3). In this case, first I cover the split rods from above with the first rod, and then with the second I cover the rods threaded into the split from below. And at the same time, he presses the first rod (Fig. 4). I also do the third and fourth turns.
After this, I fan out the crosspiece rods, which I braid with two rods: one from below, the other from above (Fig. 5). I press the coils tightly against each other with an awl. I install the rods in two ways - by cutting their ends obliquely and laying them butt to butt or top to top (Fig. 6). I insert the side ribs when the bottom of the desired size is ready.
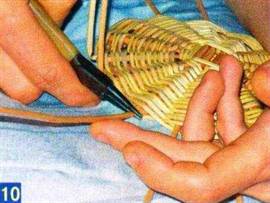
Here, too, I use round rods, the ends of which I cut off obliquely by about 5 cm. I insert the pointed ends into the interweaving of the rods with the edges of the bottom - there are two rods on both sides of each edge. I cut off the excess ends of the bottom ribs. I weave the edge of the bottom from four round rods, which I carefully stick at the tops to a depth of 4 cm near the four adjacent side ribs (Fig. 7). I bend the first of these rods to the right over the three lateral ribs and place it under the fourth, the second - over the two ribs under the third, the third - like the first, the fourth - like the second (Fig. 8).
After this, I continue the edge of the bottom, bending all four rods over three ribs and dragging them under the fourth. This is how I complete one full circle. To get the intended shape of the basket, I make a corresponding blank (Fig. 9).
I nail the bottom of the basket to it with several nails, collect the ends of the side ribs into a bundle above its center, tie it, and make sure that the spaces between the side ribs remain the same (Fig. 10). I weave the second and third rows of the edge of the bottom in the same way as the first - I bend each rod over three ribs and pass it under the fourth. I pull all the rods tightly and press them tightly together with an awl. Having finished braiding the bottom, I cut off the unnecessary ends of the rods.
Braided sides
After that I start working on the walls of the basket. They have split rods on them. I insert them with the butt inward between the side ribs and braid them through one edge (Fig. 11). Having brought the weaving to the basket shape specified by the blank, I release the bundle. And I remove the blank, continuing weaving, trying to maintain equal spaces between the ribs.
I begin braiding the upper edge when the walls of the basket reach the desired height. The outer edge consists of two rows. The bottom row is woven from three round rods, which I stick into the weave with their apical ends to a depth of 4-5 cm near three adjacent side ribs. I bend each of these rods over two side ribs and insert them under the third (Fig. 12). Having finished weaving the circle, I cut off the excess ends from the inside of the basket near the same side ribs near which weaving began. I make the last row from the ends of the side ribs of the basket, bent down. I break the rod-ribs with my fingernail at a height of approximately two rod diameters from the edge of the basket, bending it down and to the right (Fig. 13).
I carefully remove the first four ribs after each next two. I pass the bent edge over three vertically standing ribs and drag it under the fourth. I bend the fifth vertical edge under the next two vertical ones and take it out from under them. Now I pass the second of the downwardly bent ribs over the three vertical ones and drag them under the fourth. I bend the sixth vertical edge behind two vertical edges.
And so everything is repeated until the third and fourth ribs reach the end of the row. Now I go around the fifth, sixth, seventh and eighth ribs and braid them in the same way as the first four. I bend the last four pieces and pull them through the beginning of the weaving one by one. To do this, I use an awl to slightly widen the gaps between the rods. I cut the remaining rods obliquely so that their ends rest on the initial ones. After sprinkling the basket with water, I give it its final shape with my hands.
I make a handle from one or two thick rods. I insert their pointed ends into the weaving to a depth of 15-20 cm, having previously widened the gaps with an awl (if desired, the connection between the handle and the basket can be secured with small nails).
All that remains is to braid the handle with split twigs (Fig. 14), and the basket is ready. With patience, you can weave the baskets shown in the photo or come up with other options. I wish you health, patience and good luck.
Willow baskets are ideal for collecting and storing mushrooms and berries, fruits and vegetables, and other things that are found on the farm. In addition to being a wonderful addition to the interior, willow baskets can be used as an additional source of income. If you would like to get such a basket in your home, but have never done wicker weaving before, read this master class on weaving large or small baskets from natural willow, which is just right for beginners.
First, we need to know some words that are used in weaving. First, the rods that radiate out from the center of the bottom of the basket are called spokes. Next, when you bend these rods upward to begin weaving the walls, they are called uprights. Actually, only these two terms should be known in order to understand what is being said in our master class.
Weaving a willow basket with a description for beginners
Collection and preparation
Willow twigs can be found in rural areas, but if it is not possible to visit a village or village, you can order willow twigs through special online stores. If you nevertheless decide to collect willow branches yourself, then you need to know a few secrets so as not to make a mistake. Firstly, the willow branch must bend 90 0 without breaking. Second, the best willow branches often have red or orange bark.

After we have collected the rods, we need to dry them thoroughly. If this is not done, the basket will very quickly lose its shape. Before starting weaving, thoroughly soak the willow branches; this promotes greater flexibility, which is undoubtedly a huge advantage when weaving baskets and other things from willow branches.
To create baskets from willow branches we will need:
- Secateurs
- Ready willow branches
As you can see, there are very few materials, and besides, they can be found in almost any home.

Our master class will use the classic technology of weaving willow baskets. Almost all masters weave using this technology, sometimes adding their own elements that are not very different from the data.
First we will learn how to weave the bottom of a basket. For this we need eight rods, in four of which we make holes. We insert the other four twigs into these holes.

Now we need to select the two thinnest willow twigs to start weaving the bottom. We insert their ends into the slots of the slot so that one rod is on top of the four rods of the cross, and the second is below.

Next, we begin to braid four knitting needles with two thin rods. We weave so that they change places, i.e. the twig that was initially on top, after braiding the second four knitting needles with it, will be on the bottom. And the one that was below will therefore be on top. We continue to weave two rows like this.

Now we braid one knitting needle at a time with the same thin rods, bending them evenly so that it looks like a wheel. We continue to weave like this.

If you notice that your thin twigs are running low, they will need to be extended. In order to extend the twig, you need to take another, equally thin one, sharpen the end and insert it between the twigs of the last two rows. Then carefully cut the old rod and continue weaving. We advise you not to extend two rods at once; it is better to extend the first one first, and after a row of weaving, the second.

After weaving a few more rows, we move on to simple way weaving, i.e. you simply go around the outside and inside of the knitting needle with a twig. But in order to start weaving like this, we need to add another knitting needle. There is nothing complicated about this, just place it between the twigs of the last two rows using an awl or a thick nail. Continue weaving in this way until you get the desired bottom size.

If the bottom suddenly becomes concave, do not be alarmed, this is even good, as it will give the basket stability. To get a concave bottom, simply press on the knitting needles while weaving.
Now we begin to weave the walls of the basket. We take 17 willow shoots and insert them into the weave along each knitting needle. Please note that it is best to insert it so that the concave side of the branch faces down.

Carefully cut off the ends of the old twigs and take a new stand. We bend it to the left, then down under two adjacent twigs. Then we turn it upward. We do the same with subsequent rods.
Just twist the last two rods around the first posts and tie the posts on top to make it easier to weave and the rods don’t fall out.
Now we take three more rods and place them along three adjacent posts.

We bend the leftmost rod to the right in front of two posts and behind one third, then we return forward again. We do the same with the other two twigs. We weave two rows like this, now our racks are firmly fixed and will not fall apart if we untie them.

Next we weave the walls of the basket. To begin with, you need to add one thin twig to each rack. We place the rod behind the rack, then pass it forward, pass it behind the third rack and bring it forward again. Now you need to add the next rod and do the same steps. Add more twigs until you have covered the entire basket. Please note that at this stage you need to weave to the left.