In the article we will talk about how an electrician is made in a house with our own hands, wiring diagrams will also be considered. If a couple of decades ago, the loads on the electrical networks of cities and even villages were insignificant, but today the picture is the opposite. A lot of high-power household appliances - washing machines, multicookers, split systems and more.
The load on the electrical networks has increased many times over. And if the city has some reserve, then there is no such thing in the wiring of a private house, therefore, an increase in the load leads to the fact that the wires do not withstand and begin to collapse. Therefore, the question is that the electrician in the apartment and the house with their own hands should not only be repaired, but also completely changed.
Previously, they did wiring in houses according to the simplest scheme - a switch and a socket for each room, but in modern conditions this turns out to be too little - you want to turn on three chargers, and a laptop, and a TV, and so on. To independently make wiring in the house, you need to know certain rules and standards that should be followed during installation. You will also learn how the wiring diagram is made, how to breed it correctly with your own hands and the requirements for it.
Regulations
Building materials and all activities of builders are regulated by certain rules and requirements, they are called GOST and SNiP. The Electrical Installation Rules (hereinafter PUE) also apply to electrical wiring in houses and structures. It is this regulatory document that prescribes all the requirements for electrical equipment, thoroughly indicating what to do with it and how. All electrics in the apartment and house are connected to the voltage with their own hands only after all checks for a short circuit have been carried out.
Requirements for electrical wiring in private houses and apartments

In the event that you decide to independently make electrical wiring in your home, you must carefully study all the requirements for it. But the main attention should be paid to the following points:
- Main Components electrical wiring(distribution boxes, switches, sockets, meters) must be made easily accessible. It is quite simple to install the wiring in the house with your own hands. Electricity, however, is demanding in terms of safety. But all the rules can be easily observed.
- Switches according to the PUE must be performed at a level of 0.6-1.5 meters from the floor surface. And you need to pay attention to the fact that when opening the doors they should not create an obstacle. For example, if the door opens to the right, then the switch must be located on the left. And if the door opens to the left, then the switch is mounted on the right. The cable must be laid to the switch from above.
- Sockets are mounted at a level of 0.5-0.8 meters from the floor surface. The fact is that at this level it is necessary to have it for safety purposes when the house is flooded. Moreover, a distance of at least 0.5 m must be maintained from a gas or electric stove, heating radiators, pipes (and other grounded items). Wires go to all sockets from the bottom up. This is how it is done by hand. Wiring diagrams are given in the article.
- For every 6 sq. m. area of the room should be one outlet. An exception is the kitchen, in which as many sockets are mounted as necessary (based on the number of household appliances located in it). It is forbidden to install sockets in the toilet, but in the bathroom it is allowed, only on condition that there is isolation through a transformer (220 volts are supplied to the primary winding, the same amount is removed from the secondary). The transformer is installed outside the bathroom.
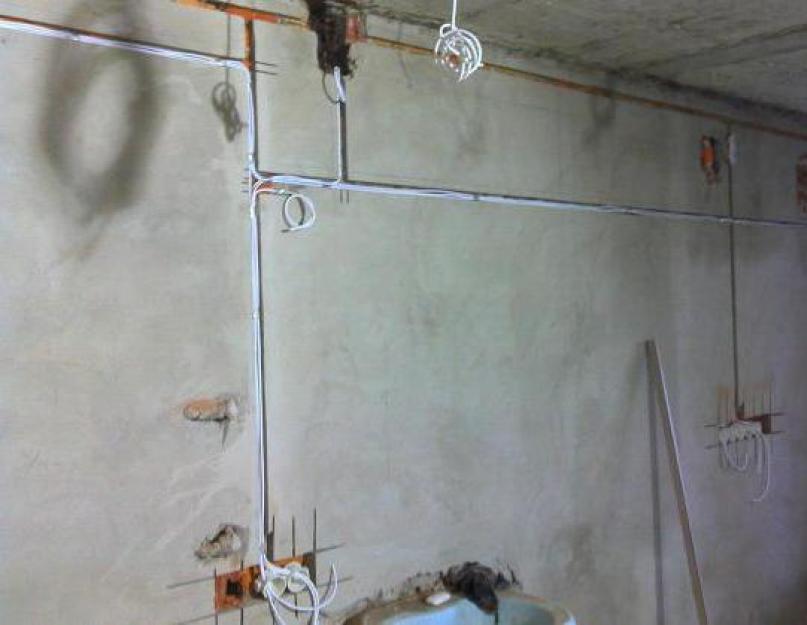
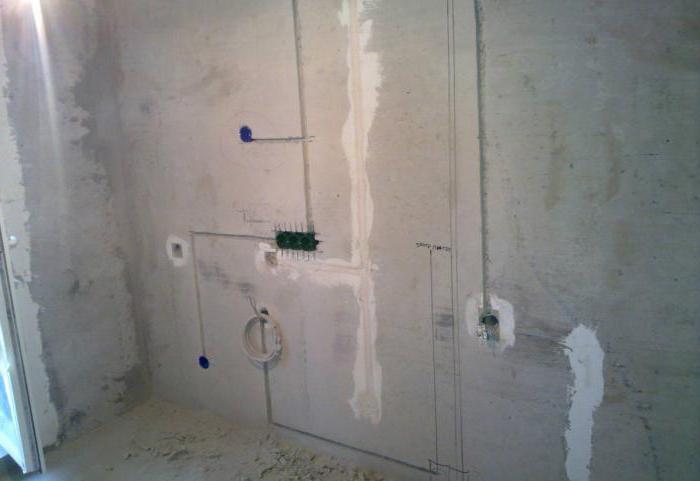
- Before starting work, you need to make a wiring plan, clearly indicate its location in the walls. Please note that all wires must be either horizontal or vertical - but not diagonally or in a broken line. So the wiring in the house should not be done with your own hands. The wiring diagram of all devices must take this feature into account.
- There must be a certain distance from ceilings, pipes and other obstacles. For example, from the beams you need to maintain a distance of 5-10 cm, from the cornices - the same amount. About 15 cm must be maintained from the ceiling, and 15-20 cm from the floor. If we are talking about vertical surfaces, then there should be at least 10 cm from door and window openings. But between gas pipe and wiring must maintain a distance of more than 0.4 m.
- External or hidden wiring should not touch the metal parts of any structures.
- If several wires run in parallel, the distance must be maintained between them over three millimeters. An alternative option is to hide each wire in a protective box or corrugation. So the electrician is mounted in the house with his own hands. Schemes should be designed with this in mind.
- Connecting and distributing wires should be in special junction boxes. All joints must be carefully insulated, and one feature must be taken into account - it is forbidden to connect copper and aluminum wires. If you make wiring from copper wire, then you make it all out of it, there should not be any sections of aluminum.
- Grounding (including zero wires) must be fixed to all devices using bolted connections.
These are the requirements that all electricians ask for. You can draw up wiring diagrams with your own hands only if you take into account all these rules and regulations.
house wiring project

First of all, you need to create a wiring project, it all starts with it. From it will be repelled in the future during the installation. Of course, it will be much better if it is made for you by experienced technicians who have been doing this for more than one year. But if you have experience, go for it.
But keep in mind that your own safety depends on how the project is made. You definitely need to know what symbols are used when drawing up diagrams and projects. It is worth noting that Russian standards are quite different from European or American ones, so you should not use foreign schemes in our country. All the electrics in the house are designed with their own hands (the diagrams are given in the article) at the initial stage.

Draw a plan of a house or apartment, mark on it the places where sockets, switches, chandeliers, etc. will be installed. The number of electrical appliances was mentioned a little lower. At this stage, the main goal is to create a diagram on which all the places for mounting devices will be indicated. The second part is to outline the places for laying wires around the apartment. Of course, you need to know where the household appliances will be.
Wiring
Then make the wiring of all wires. And if creating a scheme with the location of consumers is a simple matter, at this stage of work it is worth dwelling in more detail. Three types of connections and wiring can be used:
- Consistent.
- Parallel.
- Mixed.
The third one is considered the most attractive from the point of view of saving materials.

An electrician is made in the house with his own hands (mixed-type circuits) with the highest possible efficiency. To make your work easier, ungroup:
- Lighting corridors, residential premises, kitchens.
- Bathroom and toilet (lighting).
- Sockets in living rooms, corridors.
- Sockets in the kitchen.
- Electric stove socket (if necessary).
Please note that this the simplest option groups of electricity consumers. The fewer groups, the less materials will be used up. The above example is the simplest and most economical. It can be complicated: literally to every outlet, for example, to bring electrical wiring. You begin to realize a little about how to conduct an electrician in a private house with your own hands.

To simplify the laying of electrical wiring, it can be mounted under the floor (for sockets). In the case of overhead lighting, installation in floor slabs can be carried out. Ideal for the "lazy" way - there is no need to ditch the walls and ceiling. Moreover, on the plan diagram, this type of wiring must be marked with dotted lines.
Current consumption calculation
Be sure to take into account the strength of the current that will flow through the network. There is a simple formula for this: current strength is the ratio of the total power of all consumers to voltage (we can say that this is a constant, since the voltage standard in our country is 220 Volts). Let's say you have the following consumers:
- 2000W electric kettle.
- A dozen incandescent lamps, each 60 watts (600 watts in total).
- 1000W microwave oven.
- Refrigerator with a power of 400 W.

The voltage in the network is 220 V, the total power is 2000 + 600 + 1000 + 400, that is, 4000 watts. Dividing this value by the voltage in the network, we get 16.5 A. But if you look at practical data, then in apartments and houses the maximum current consumption rarely reaches 25 Amperes.
According to this parameter, it is necessary to select all materials for installation. In particular, it depends on the strength of the current Please note that you must always take a margin of 25%. In other words, if you calculated a current consumption of 16 A, you cannot install a fuse with the same tripping current value. It is necessary to choose a standard value greater than the calculated one.
Wire brands for use in homes

Now about how the electrician is mounted in the house. The cable (PUE rules regulate all its parameters) must be selected based on current characteristics. It is desirable that the wiring in the house or apartment be made of the following materials:
- Wire brand VVG-5X6. This wire consists of five cores, each has a cross section of 6 square meters. mm. It is widely used for houses that have a three-phase network to connect the light box to the main one.
- VVG-2X6 has two cores with a cross section of 6 square meters. mm. It is widely used for single-phase power houses to connect the light box and the main one.
- The wire brand VVG-3X2.5 has three cores, each with a cross section of 2.5 square meters. mm. It is used to connect lighting boards with junction boxes. Also from boxes to sockets.
- Brand VVG-3X1.5 has three cores, each with a cross section of 1.5 square meters. mm. It is used to connect switches and lighting lamps.
- The brand is three-core, the cross section of each core is 4 square meters. mm. It is used to connect electric stoves.
Material counts

Now consider what components (including small ones) the electrical wiring in the house consists of. Do-it-yourself project, wiring, installation, is carried out quickly enough. True, you will have to try pretty hard to count the number of wires as accurately as possible. To do this, according to the plan, go through the apartment with a tape measure. After taking measurements, add four meters on top - the stock will not be superfluous.
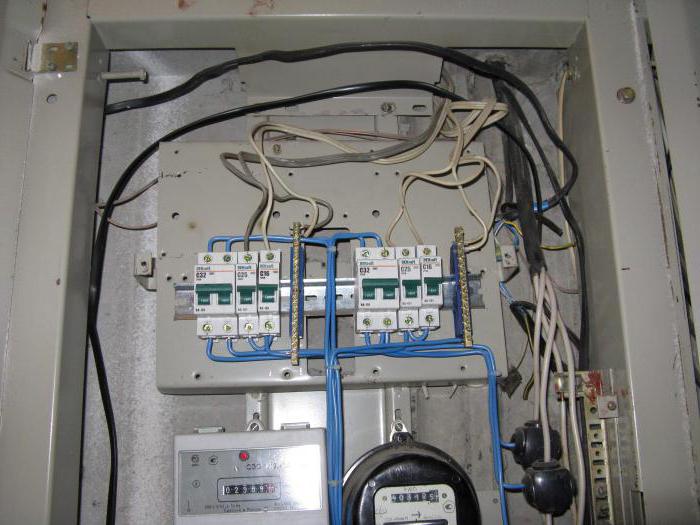
At the entrance to the house, all the wires from the house are placed to it. It installs automatic switches. Please note that the machines must have a maximum tripping current of 16 or 20 Amps. must be connected via a separate circuit breaker. With a power of up to 7 kW, a 32 A automatic machine is used, with a larger one - by 63 A.
After counting the number of junction boxes and sockets, there is nothing complicated in this matter, this is done according to the scheme drawn up earlier. In the future, you will need various "little things", for example, insulating tape, lugs, tubes, cable channels, boxes, thermal insulation, and others. Now it’s worth talking about what tools do the wiring in the house with your own hands. The scheme is considered in some detail.
Work tools

When carrying out, always follow the safety rules. In order not to get confused, it is better to do it yourself, but if you have a partner, then help should be minimal - give, bring, do not interfere. You will need the following tool:
- Multimeter.
- Perforator.
- Bulgarian.
- Screwdriver.
- Pliers.
- Wire cutters.
- Curly and flat screwdrivers.
- Level.
If you are doing repairs in an old apartment and changing the wiring at the same time, you need to pull out all the cables so that they do not interfere. For this work, a special electrical wiring detection sensor is useful.
Marking the location of the wires
On the wall, put marks along which you will lay the wires. Pay attention to whether the position of the wires complies with the rules. After the places for the passage of electrical cables have been outlined, sockets, boxes, shields and switches can be marked. Please note that in new apartments there is a niche for installing a shield. And in old houses, shields are simply attached to the wall.
Wall chasing
First of all, install a special nozzle on the puncher and drill holes for installing junction boxes, switches and sockets. To lay wires, it is necessary to make grooves in the walls - strobes. They are made using a grinder or a perforator. Whichever method you choose, dirt and dust will suffice. The groove should have a depth of 2 cm. As for the width, it should be enough to lay all the wires. As you understand, do-it-yourself wiring is a simple matter, it is more difficult to make installation from a physical point of view.
Separate story with the ceiling. If you plan to make a hinged one, then simply install all the wires on the floor. This is the easiest way. A little more difficult is to make a shallow strobe. And one more - to hide in the ceiling. For example, in panel houses, such ceilings are used in which there are internal voids. Therefore, two holes are enough to lay the wires. And the last thing is punching holes in the corners of the rooms to bring the wires to the central shield. After proceeding to closed (you have to ditch the walls) or open methods.
Conclusion
The most important thing in the installation of electrical wiring in houses and apartments is to adhere to all the rules and regulations in accordance with GOST, SNiP, PUE. So you can not only achieve maximum efficiency from electrical wiring, but also reliability, durability, and most importantly - safety. And try to use only high-quality materials during installation. For example, it is desirable to use copper wires - they have a much longer service life (better conductivity, they heat up less).
A century ago, introduction to electricity began with a modest "light bulb of Ilyich" suspended from the ceiling by a wire. Today, the power grid is a prerequisite for a comfortable existence and the basis for the engineering networks of any home, and the key to trouble-free operation of all electrical appliances is reliable wiring...
More than ever before, people today need electricity, which is needed for almost everything from charging your phone to heating water. In order for the usual lifestyle not to be disturbed, high-quality wiring installation in the house is necessary. For its implementation, the experience and practical rules accumulated by specialists will be useful.
Electricity is a source of comfort
Safety Basics - Mistakes and How to Avoid Them
Ignorance or inattention to details can lead to installation errors. With further operation, such wiring in the house will cause malfunctions, damage to property, and sometimes a fire. There are simple rules that allow the master to act not at random, but according to safety rules:
In a new building, before laying the wiring, a place is selected for the switchboard. It is installed close to the entrance, in a non-freezing room. When drawing up a shield diagram, it is wise to immediately think about the RCD (residual current device), the ground loop and other protective devices.

Mounted switchboard
All work on the replacement of electrical wiring (in the old dwelling) must be carried out with the power turned off at the electrical panel. It is required to leave a warning sign on it to avoid an unpleasant surprise.
Wiring in the house is preceded by drawing up a detailed network plan and connecting electrical appliances.
Even if all circuit breakers are turned off, before starting work, the presence or absence of voltage on the contacts or conductive surfaces is checked with an indicator screwdriver.

A warning sign must be hung on the introductory machine
The most common mistakes:
Use of aluminum wires. According to the requirements of the PUE (rules for the installation of electrical equipment), it is allowed to use aluminum wires with a cross section of at least 16 mm² in residential buildings. Wires of this diameter are usually used only in cables that carry current to the house, but not inside it. When replacing wiring, a combination of copper and aluminum parts is unacceptable - at the point of their connection, the contact will burn out over time due to contact resistance.
Insufficient waterproofing. For long and safe operation of the system, it is necessary to take care of the thorough insulation of all wires in rooms with high humidity. Poor-quality insulation most often finds itself in the bathroom, pantry, kitchen or terrace.
Shtroba. A depth of 2-2.5 cm is considered optimal. Grooves with a shallower depth are difficult to plaster.

Chasing the wall for wiring
Cable work. Diagonal laying is prohibited; the wire cross-section must be calculated according to the system parameters.
distribution boxes. To avoid confusion and ease of maintenance, they are placed under the ceiling.
An example of drawing up a wiring diagram in a private house
The scheme of future electrical wiring is based on the plan of a private house. It consists of two parts, electrical and assembly. The main elements are outlined schematically, “for themselves”.
Electric circuit. The wiring diagram in a private house shows the method of including energy consumers in the circuit and their number.

Wiring diagram example in country house
Assembly diagram. Specifies where to mount devices. This data will help you calculate the number of cables and additional consumables needed.

Mounting version of the wiring diagram
The main elements of the network include wires, sockets, switches, meters, fuses and relays, junction boxes, in addition:
entry point for external power cable;
connection points for high power household appliances;
ceiling and wall lighting fixtures.
The beginning of the power supply of the house is the electrical panel. A supply wire is supplied to it from the outside (more often through an overhead line), supplying a single-phase or three-phase current.
On our website you can find contacts of construction companies that offer. You can directly communicate with representatives by visiting the exhibition of houses "Low-Rise Country".
An example of drawing up a plan for the location of electrical equipment on video:
To increase reliability, consumers are divided into groups on the shield (connection by groups of points):
Lighting.
Socket sockets.
Power elements (boiler, electric stove, washing machine).
Household groups (basement, garage).
Breakdown of consumers by rooms or floors is allowed. In this case, each group needs individual protection devices (automatic devices, RCDs).
Each room has a lighting and socket group, there are more of them in the kitchen (warm floor and electric stove are connected as a separate group). For powerful household appliances and circuit lamps in the bathroom, grounding is provided (connection via a cable with an additional residential "ground").
Preparatory work for the electrical wiring device
So that wiring in a country house does not cause problems during operation, preparatory work and calculations. These include the calculation of the total power of the devices planned for installation; based on these numbers, the cable is selected.

The power of some household appliances
Power consumption calculation
The total power consumption is the sum of the individual capacities of household appliances, lighting elements and power equipment. These values are taken from special tables; they can be found in the technical data sheets of the devices.
To independently obtain the final power consumption of the devices, it is necessary to sum up the power of all consumers on this wire. It is known that at the same time all devices are not turned on. Therefore, the resulting amount is multiplied by the demand correction factor (simultaneous use factor). The coefficient is 0.8 (if the total power is less than or equal to 14 kW), 0.6 (up to 20 kW), 0.5 (up to 50 kW).
Example: if the resulting number is 32.8 kW, then the estimated power consumption is: 32.8 * 0.6 \u003d 19.68 kW.
By dividing the total power by the voltage (220 V), you can find out the maximum current. For example, if the power turned out to be 5 kW (5000 W), the current strength is 22.7 A.
A visual example of calculations in the video:
Choice of cable cross-section by length and power
The cable cross section is selected according to the previously determined maximum load current and the conductor parameter (current density for this material). With a current strength of 22.7 A and a conductor density of 9 A / mm2 (copper), a conductor with a cross section (CPS): 22.7 / 9 \u003d 2.5 mm2 will be suitable.
Copper is considered best material due to its properties: wear resistance, high thermal and current conductivity (even during oxidation), ductility. Copper wire lends itself well to twisting and can withstand a load twice that of aluminum of the same section.

Calculation of the section according to the load (kitchen)
2-2.5 mm2 is considered the optimal cross-section for the socket group, 1.3-1.5 mm2 will be sufficient for connecting lighting devices, for powerful electrical appliances it is better to play it safe - at least 4 mm2.
The length of the cable is calculated by taking measurements of all straight sections with the addition of an allowance of 10-15 cm on each side. The approximate length of the cable can be obtained by multiplying the area of \u200b\u200bthe premises by two.
The sequence of installation work
Installation work requires an integrated approach. They begin after the acquisition of the cable. Additionally, electrical accessories are purchased: sockets, socket boxes, switches, cable channels and junction boxes.

All materials must be prepared in advance.
Ground Loop Installation
Any a private house must be equipped with a ground loop, which performs several tasks:
Protects the inhabitants of the house when voltage appears on the device case.
Maintains the safe operation of appliances operating in a humid environment (washing machines and dishwashers, electric stoves, boilers and instantaneous water heaters).
Reduces the level of noise (interference) in the electrical network.
The circuit is mounted in the ground next to the house; inside, grounding is connected to the electrical panel. It is required for:
high power electrical engineering;
light sources (chain groups) in bathrooms.

Switchboard installation
Installation of switchboard elements
After the electricity connection scheme in a private house is selected, and the consumers are divided into groups, a switchboard is mounted. It contains:
-
neutral bus and main ground bus.
circuit breaker and RCD - common;
automatic machines and RCDs - for selected groups;
On the shield, the function of the core can be determined by the color of its insulation:
white (sometimes red, black or brown) corresponds to the phase;
blue - zero;
yellow-green - protective earth.
The final switchboard for electrical wiring in a private house is assembled after the wiring is completed.

Applicable wire colors
Installation of electrical wiring of closed and open type
Wiring in a new house is laid in two ways - open and closed, and the first option is often chosen if the second cannot be used.
Open wiring. It is laid over the walls and, if desired, protected by cable channels. It has its advantages - it is always available for inspection. At the same time, like any technical element in the interior, it hurts the eye. The exception is the design of rooms in the loft or retro style, where such solutions are welcome.
With open installation, the cable is fastened with brackets to the surface, then it is closed with a box. Recesses for sockets and switches are made with a puncher or drill.

Box (cable channel) for open wiring
Hidden wiring. With hidden installation, you have to ditch the walls (punch channels), lay the wires and hide them behind the wall trim. This method is more reliable and durable, but at the same time time-consuming and costly for future alterations. In order not to touch the cables when drilling walls in the future, it is worth stocking up on a network layout plan.
Electrical wiring in the house is done according to an invariable rule: laying is done strictly horizontally or vertically, any other way is not allowed. Bends are made at right angles.
Before installation, in accordance with the scheme, walls, horizontal and vertical sections are marked. This can be done using a laser level or a plumb line smeared with chalk or charcoal. You can take pictures of the walls with the markings applied. The memo will help in the future not to touch the wiring with a drill or a nail.

You need to draw a diagram of the location of the wires inside the walls
With hidden installation, strobes (grooves in the wall surface) are pierced with a chisel or grinder or a special chasing cutter. The wires are placed in strobes, they are fixed and masked with plaster or alabaster. Sometimes hidden wiring is carried out not in the strobe, but under the plinth, which retains access and the possibility of verification.
Wiring in a wooden house
The organization of wiring in such a dwelling has its own characteristics. Internal wiring with wires buried in the walls increases the likelihood of fire for wooden structures. Therefore, the open version is the safest.

Electrical wiring in a wooden house
It is preferable to use a flat cable; to prevent sagging, it is fixed with fasteners made of tin or plastic.
When the network is assembled and all elements are connected, the serviceability is checked.
For wiring errors in a wooden house, see the video:
Lead time and approximate cost of some works
Turnkey electrical installation in a cottage is completed in 4-6 days on average. Complex installation will cost 18-60 thousand rubles, replacement of wiring - 15-36 thousand rubles.
Electrical wiring on the floor of a private house will be carried out for 9-12 thousand rubles.
A comprehensive replacement of wiring in a wooden house will cost 18-29 thousand rubles.
Laying a cable with a cross section of up to 4 mm in a strobe - 25-30 rubles. for m/n.
Laying a cable with a cross section of more than 4 mm in a strobe - 42-55 rubles. m/n.
Chasing plaster walls - 75-85 rubles. for m / n, brick - 92-100 rubles. for m / n, concrete - 105-112 rubles. for m/n.
Electrical panel assembly (meter + 3 machines) - 980-1100 rubles.
Connecting an electric meter with installation (220 volts) - 665-720 rubles.
Connecting an electric meter (380 volts) - 1050-1130 rubles.

Loft-style interior with exposed ceiling wiring
General rules for connecting to the electrical network
Following the installation of electrical wiring, automatic machines, RCDs and electrical appliances are installed. To put into operation the electrical equipment of a private house, a specialist from the energy supervision, authorized to conduct acceptance tests, is invited.
After checking the safety of the electrical installation, a "Act of approval for connection" is issued, allowing the further use of the equipment. Based on this document, the energy supply organization concludes an agreement with the owner of the house and connects the dwelling to the support.
Clearly about the connection of electrical wiring in the video:
Conclusion
The life of a modern person is so dependent on electricity that even an hour without electricity seems to most to be endless. Things stop, the rhythm goes astray, plans remain unfulfilled. Faulty installation can lead not only to short-term malfunctions of the system.
Electrical malfunctions (caused by violation of the rules for the construction and operation of electrical equipment and household electrical appliances), according to the Russian Emergencies Ministry, caused 41,374 home fires in 2017. To protect your home and your loved ones, you should take care of many things in advance, but you should start with high-quality electrical wiring.
The technology of electrical wiring in wooden houses has its own characteristics. Not only will it be necessary to pull the cable from the nearest substation to connect to the network, but the wiring inside the premises must be carried out in compliance with special safety standards.
Wiring Requirements
Wood is the most popular material used in the construction of private housing. Despite its merits, wood is a fire hazardous and highly flammable material.
Regardless of the material - brick, gas silicate blocks, concrete, timber, when a fire occurs, an open fire spreads to the furniture and interior decoration of the room. First, everything inside the room burns down, and only after that the load-bearing walls, partitions and roofing begin to burn.
Basic requirements for electrical wiring in wooden buildings:
- Safety - Wiring must be routed in such a way as to minimize the possibility of overheating and ignition of the cable, as well as to prevent the transmission of open flames to adjacent wooden structures.
- Design - the technical characteristics and performance of the wires and components used must correspond to the calculated peak load in a particular section of the electrical network. To prevent heating, the cable cross-section is selected with a margin of 20–30%.
- Laying method - it is preferable to carry out electrification of wooden buildings in an open way. This allows you to easily and at regular intervals to diagnose the state of the power grid.
- Isolation - the location of the input node (electric panel) must be isolated from the interface with wooden structures. Ideally, if the electrical panel is installed in a room with a partition made of non-combustible materials.
- Conductor - as a conductor, it is better to use a three-core copper cable with insulation from non-combustible materials. Laying the cable in PVC corrugation is strictly prohibited.
- Automation - an automatic switch must be installed for each group in the electrical network. The circuit breaker current rating is selected in accordance with the load on the site. It is highly not recommended to overestimate the current rating, as this will lead to overheating of the conductor.
It is not recommended to carry out independent laying of a power cable and installation of an electrical network without appropriate experience - this should be done by specialists. But every owner of a private house must know the basic rules of electrification. This will allow him to diagnose the existing wiring, and also make it possible to control the quality of work of hired electricians.
Regulations
Rules for the installation of electrical installations is the main document for the design of electrical wiring
General requirements and rules for electrical wiring are described in the following documents:
- PUE, edition 7 - the main document used in the design of the electrical network. It describes in detail the choice of conductor, switchgear, automation and lighting.
- SNiP 3.05–06–85 - electrical wiring in old and new houses. Connection methods and rules for entering a power cable into a dwelling.
- SNiP 31–02 - requirements for the installation of a power supply system in residential buildings. The document complies with the rules and regulations described in the PUE.
The information contained in these sources is described in technical language and may be incomprehensible to an unqualified specialist. When studying independently, we recommend relying on the "Electrical Installation Rules", since this document most clearly articulates the meanings and concepts necessary for wiring in private homes.
Find out what types of sockets and switches are available and how to choose them correctly: l.
Preparation of a power supply project
An example of two electrical network device diagrams in a wooden house
After consideration of the application by the managing body, an agreement and technical conditions necessary for connection to the local electrical network will be prepared. Then you can proceed to the design of the power supply, which is performed in the following sequence:

When drawing up a project, one should be guided by the EMP. According to this document, electrical wiring is laid strictly in a vertical or horizontal direction. The optimal angle of rotation is 90 o .
The socket group, switches and junction boxes should be located in open areas with free access. Usually, switches are mounted 80–150 cm from the floor level, and a socket or socket group - 50–80 cm. The number of sockets varies from 1–6 pieces. The exact amount depends on the size of the room, but not less than one piece per 6m 2.
When designing a cable route, it should be taken into account that the minimum distance from the openings should not be less than 10 cm. If the cable can come into contact with metal elements along the route, then it is removed by 15–30 cm in any convenient direction.
Choice of wire and devices
The cross section of the electrical wiring, taking into account the total power of the electrical network
When arranging private power networks, two types of cables are used: NYM and VVGng. The NYM type cable is a power cable that meets the European standard and is used for laying electrical networks with a rated voltage not exceeding 660 V. VVGng cable is a bare power cable, double vinyl braided, operating in networks with a constant voltage of not more than 1 kW.
The cross section of the cable for laying electrical networks is determined in "mm 2". For designation, the marking is applied to the cable insulation and is indicated by two numbers. The first digit indicates the number of wires inside the single insulation. The second digit is the cross-sectional area of the conductor. For example, when an electrician says that a three-core copper cable is needed one and a half squares, this means - NYM cable 3x1.5 mm.
The easiest way to determine the minimum cross-section of the power cable core for a particular section of the network is a special table. This method is proven, as it is used in the design of electrical networks in apartment buildings. The table for selecting the cross section of the core can be found in the photo above.
As a rule, a copper cable with a cross section of 2.5–4 mm is used for socket groups, and an aluminum cable with a cross section of 1.5–2.5 mm is used for lighting. In the case of wooden houses, it is recommended to use only copper wiring, as this will protect the electrical network from overheating.
Wire of various sections for wiring in a wooden house
According to the PUE, each section of the electrical network is equipped with a residual current device and a circuit breaker designed for the corresponding current indicators. To calculate the current strength, the standard formula is used -I \u003d P / U cosφ, where:
- I - current strength;
- P is the total power of electrical appliances connected to one section of the power grid;
- U - voltage in the mains;
- cosφ is a constant coefficient. In household networks, it is almost always equal to 1.
For example, it is required to determine the current strength for the network section to which household equipment with a total power of 3 kW will be connected. I \u003d 3000 / 220 \u003d 13.64 A. Taking into account a small margin and rounding, it turns out that this section will require an RCD and a diphatomat, designed for a rated current of 16A.
To determine the type of circuit breaker, it is necessary to calculate the minimum short-circuit current: I short circuit = 3260 x S / L, where S is the conductor cross section in mm2, L is the conductor length in m. As a rule, in networks with a mixed load, which will be presented in most private houses, type “C” machines are used.
Sockets are selected taking into account the power of electrical appliances. Usually, these are sockets with grounding, rated for 16 A current. It is worth remembering that if it is planned to use several electrical appliances in a particular room, then it is better to install a socket group for 2-3 products than to use a “tee” in the future.
Selection of input cable and automation
On the left - an electric meter, on the left - an RCD with a lead-in cable
Scheme of the device of a single-phase power supply network
A single-phase electrical network is the most common way to electrify private houses and standard apartments. The rated current voltage in a single-phase network is 220 V with a frequency of 50 Hz.
The structure is powered by a two- or three-core power cable, which is connected from the local substation to the electrical switchboard inside the building.
In the first case, a two-core cable without grounding is used. In the second case, a three-core cable is used with a working "phase" (L), reverse "zero" (N) and protective earth.
You might like the idea of retro electrical wiring. More details about installing the system in a wooden house in our next material:.
Do-it-yourself installation of electrical wiring in a wooden house - step by step instructions
It is optimal if the switchboard is installed in a special room with a concrete partition or wall
The technology for installing electrical wiring in a wooden house will consist of several stages: supplying a power cable to the house, installing a switchboard, laying a cable route, connecting contacts and checking performance.
To carry out the work, you will need to prepare an electric drill with a crown nozzle, a screwdriver, a Phillips and slotted screwdriver, an indicator screwdriver and protective rubberized gloves.
Switchboard installation
Switchboard for a private house for 12-24 modules
The switchboard is a device for entering a power cable and distributing incoming electrical energy. Inside the shield there is electrical equipment responsible for the connection, accounting, safety and correct operation of the power supply system.
Ready-made switchboards from the manufacturer are a plastic, metal or combined box with a door, DIN rail, zero and ground bus. The shield dimensions are selected according to the number of modules used. For wooden houses, a shield for 12–15 modules is enough.
The installation of the shield consists of several stages:

When using a shield for 16–24 modules, as a rule, there are two DIN rails in it. It is better to install an introductory machine, a counter and an RCD on the upper rail in the required quantity.
Circuit breakers will be located on the lower din-rail. This type of distribution of modules will allow faster and more convenient connection. After mounting all the elements, it is recommended to mark the modules according to their group. The shield assembly sequence is shown in the video below.
Related video: switchboard assembly and layout
Cable entry into the room
Laying a power cable to a residential building by air
The input of a power cable into a residential building can be performed in two ways: underground and by air. The first method is more reliable, since an armored cable protected by a corrugated pipe will be used. In this case, the wiring itself will be located under a 30-40 cm layer of earth.
A trench 70–80 cm deep is dug to lay the cable. A 15–20 cm layer of fine-grained sand is poured into the bottom of the trench and it is well compacted. Next, on sand cushion a protective corrugation is laid through which an armored cable is passed. Then the corrugated pipe is covered with a 10–15 cm layer of sand. At the end, the pipe is completely walled up in the ground.
Laying a power cable to a residential building underground
Cable routing through the air is carried out in cases where the distance between the house and the substation is too large. For this, a cable with a carrying cable is used, which is stretched between the supporting and residential buildings. If the distance from the post to the house exceeds 20 m, then an intermediate support is installed between them.
When a power cable is inserted through a load-bearing wall, a sleeve made of non-combustible materials is installed at the interface. It is optimal if the cable is introduced in the immediate vicinity of the location of the switchboard.
Installation of overhead switches and sockets
Removing the button and the face of the socket before installation
Overhead switches and sockets are used for both open and hidden wiring. The technology for installing a switch and a socket is similar, so let's take the process of installing a switch from Schneider Electric as an example.
The installation process consists of the following:

At the end, the operability of the switch is checked and the final assembly is carried out. The installation technology of the surface outlet is similar. As a rule, a three-core cable is used to connect sockets, therefore, when connecting, a yellow-green cable (ground) is present, which is connected to the central terminal.
Connection of wires and contacts
When installing electrical wiring in a wooden house, the use of "twists" is not allowed. Ideally, if part of the cable from the difavtomat to the point of consumption is made from a single piece of wire.
To do this, before cutting the cable, it is required to mark the wall surface. Next, using a tape measure, you will need to measure the cable route and only then cut the cable with a margin of 20 cm.
Wago terminal blocks for wiring connection
If a cable connection is unavoidable, then it is better to use:
- Terminal block - divided into products with a tightening screw and clamping plates. The latter are more optimal, since a plate is used to contact the cable and the bus, which does not damage the conductive core.
- The spring terminal is the simplest and most effective connection method, in which the core is held in contact with the plate by a spring clip. Can be used to connect both aluminum and copper cables.
When installing electrical wiring in a wooden house, we recommend using terminal blocks from Wago. Products are distinguished by high build quality and have a wide range of products for cables of various sections. To connect, it is enough to strip the cable by 10 mm, lift the clamping levers up and lead the cable into the terminal hole.
Methods for open wiring
Exposed retro wiring using ceramic sockets and insulators
Opening wiring is the best solution for wiring in a wooden house. open way cable laying from the switchboard to the point of consumption has been used for a long time - previously the cable was located on ceramic insulators. Thus, the wiring did not have direct contact with the wooden wall.
Now this technology is called retro-wiring and is used in rooms where the total peak power is quite small and does not exceed 4 kW. In residential buildings with high peak load, this technology has a lot of disadvantages and limitations.
Open wiring in a wooden house without additional insulation
For an open wiring device, it is customary to use:

Some homeowners use a combination approach. For cable laying in straight sections, a steel straight pipe is used, and metal corrugation is used as rotary elements. This approach is not aesthetically pleasing, but it is quite reliable. For safety reasons, all metal pipes and other elements must be connected to the ground loop.
The statistics are relentless - about two-thirds of all fires in cottages are due to problems in the house electrical network. Increased attention should be paid to electrical wiring in a private house. It must always be serviceable and initially correctly designed. It is quite possible to install it yourself. The main thing is to correctly plan the wiring at the design stage of the house and mount them before the start of the interior decoration of the rooms.
Do-it-yourself wiring installation
It is customary to start laying electrical wires immediately after the construction of walls and roofs. To do this, you can call an electrician or do everything yourself. If the concept of "electricity" is not something terrible and incomprehensible, then the second option will allow you to save a little on building your house. You just need to have basic skills in handling a puncher, pliers and a screwdriver, and also do not forget about the proper security measures.
Typical wiring diagram for a private house
However, if there are doubts about your own competence in this matter, then it is better to entrust the installation of home electrical wiring to a professional. The price of a mistake here is too high, a fire that has arisen from a short circuit is able to destroy the entire cottage. Do-it-yourself wiring should be done only with clear confidence in one's own abilities and knowledge. In this case, all wiring diagrams and selected wires must comply with the rules and regulations of electrical installation.
Step-by-step instruction
The general procedure for installing electrical wiring in a house involves:
- creating a plan for laying wires and arranging wiring accessories in rooms;
- laying electrical wires in walls and ceilings or on them;
- installation of a shield, junction boxes and sockets with switches;
- switching all this into a single intra-house electrical network;
- checking the performance of the created system and putting it into operation.
There is nothing critical here. The main thing to choose correct wires so that they can withstand the load without problems, do not forget to install protection devices and carefully connect everything into a single whole.
Schema markup
Before starting to lay electrical wires, it is necessary to mark their wiring on the walls. This is necessary for an accurate understanding of the scope of installation work. Plus, “narrow” places of intersection of electrical wiring and other engineering systems will immediately be visible. For example, if there is a water pipe next to the cable, then something needs to be moved to the side. It is impossible to allow contact, even if it is potential in the future, between water and electricity.

When marking for electrical wiring, you need to take into account the presence of heaters, ceiling height, the location of windows or doors
According to the unspoken rules, when marking electrical wiring, all lines are made strictly vertical or horizontal. This reduces the risk of damage to electrical wires during further finishing and makes it easier to find them later during repairs.
Wall work
After marking, you can start drilling and slotting. But first you need to decide - the wiring will be laid in an open or closed way. In the first case, you do not need to ditch the walls, but the wires will have to be somehow covered with decor. And in the second, they will be completely recessed in the thickness of the ceilings and partitions, however, it will take a lot to drill and hammer with a perforator.
exposed wiring
With open laying, electrical wires are laid in tubes, special skirting boards and cable channels. They are made of fireproof and self-extinguishing plastics. If a private house is made of timber or logs, then this option will have to be chosen. It is impossible to mount wires inside a tree.

Open wiring options
closed wiring
Closed wiring involves laying cables in a hidden way in the cavities inside walls and ceilings. To create such recesses in brick or concrete, you will have to work with a puncher and a grinder. There will be a lot of dirt. But then all the wires will be under a layer of plaster, which will make the interior more aesthetic.

The closed wiring diagram must be designed in the early stages of repair
Wire preparation
Electrical wires are selected based on the power consumption of electrical appliances on a particular line from the shield. Usually, all consumers of electricity in a cottage are divided into groups with approximately the same load, so that the cross section of all cables in a private house is the same.
Kinds
According to the material of manufacture of wire cores, there are:
- aluminum;
- Copper.
The former are cheaper, but tough. Copper bending and laying in strobes, pipes and channels is much easier. By execution, they can be single-core or multi-core. It is recommended to take two- and three-core wires to your private cottage (the first for lighting, the second for sockets with grounding).

Types of wires for different circuits
Which ones to choose
There are a wide variety of wires available on the market today. But for self-installation of electrical wiring, you should choose the option with double insulation VVG or PVG with the additional marking "ng" (does not support combustion). These are the most affordable and optimal power wires for laying in buildings. They are in stores in all sections. Cables required for the cottage with cores of 2.5, 4 and 6 square meters. mm easy to find.
Input cable
The thickest wire in the wiring of a private house will be the introductory one, on which the total load falls. From the pole to the electrical panel, electricians from the power supply company now usually run self-supporting insulated wires (SIPs). They mount this cable themselves, and then they will have to draw the introductory line along the adjacent plot and cottage.
If the shield is on the street, then a wire of 10-16 square meters will have to be thrown into the house from it. mm. However, if you plan to install an electric boiler or powerful supply and exhaust ventilation or several air conditioners, the cross section will need to be increased to 16–25 square meters. mm, depending on the total power of all this electrical equipment.
grounding
To increase safety, the wiring diagram in the cottage must be made with protective grounding. Its task is to protect people in the home from electric shock. Connecting all household appliances in the house to sockets with an output to the "ground" is now the norm.
How to make a ground loop in a private house
In addition to wires, the ground loop includes an RCD (residual current device) and a tap to the ground. The first is installed directly in the electrical panel, and the second is usually made in the form of corners hammered into the ground.
The grounding device and its wiring as a whole must comply with the requirements of the PUE. This is checked by employees of the supplying organization when the house electrical system is put into operation. If the grounding is performed with violations, then they will simply refuse to connect the cottage to the network.

How to make grounding in a private house
Residual current system and circuit breaker
Another protective element in the house wiring diagram is a circuit breaker (difavtomat, AVDT). It should not be confused with an RCD (differential switch). They differ in purpose and principle of operation. But outwardly they are very similar.
The RCD disconnects the line only when a leakage current occurs. The difavtomat is more expensive and more difficult to perform inside. It also works in case of electrical overloads and short circuits. That is, the second apparatus initially includes the first. At the same time, in most cases, a simple RCD is enough for low-rise housing.
Distribution boxes
To simplify the wiring in the house, junction boxes are used. They connect wires connected from different sides. These mounting junction boxes securely insulate the places of electrical wire junctions and, in case of overheating, prevent the spread of fire.
Installation and switching of cables and structures
Switching of wires among themselves and with sockets and switches is carried out by means of:
- twists;
- soldering;
- terminal blocks with screw and spring terminals.
The most reliable is soldering. However, this is also the most difficult way. The twisting of the cores is allowed only if they are of the same metal. It is impossible to twist aluminum and copper. Such a connection will overheat and melt when current is applied. Most often, the wiring in the house is now assembled using various terminals. They are reliable and greatly simplify wiring.

Having started the repair, first of all it is necessary to take care of the replacement of engineering communications. After all, the functionality and durability of electrical appliances depends on them. Old wiring can, at best, disable household appliances, and at worst, provoke a short circuit that can cause a fire. Therefore, wiring in a private house must be carried out in compliance with safety requirements and in accordance with the work scheme.
Planning
As a rule, electrics in new homes do not need to be replaced. In this case, it may only be necessary to place additional lighting fixtures and new sockets. In old houses, analysis and replacement of the damaged area, preferably all wiring, is needed.
When replacing electricians, the first stage of work is to draw up a diagram in which it is necessary to clearly define the locations of the proposed location of household appliances and other electrical equipment (computers, hoods, air conditioners). Also, do not forget that in a modern kitchen you need to install a lot of outlets.

After placing all household appliances, it is necessary to calculate the resistance and load. Only after this is it determined whether additional machines need to be installed. Powerful appliances require a separate wiring diagram. This will allow you to correctly distribute the load and, accordingly, prevent power outages throughout the house.
Mounting methods
Replacing electrical wiring begins with determining its location. If you plan to completely replace the power supply system, then it is enough to find out the exact location of the wire entering the house, and already from it to lay the cable according to the established scheme. The search is carried out by means of special devices.
Wiring in a private house can be done in two main ways - closed and open. Let's consider them in more detail.
Closed way
In this case, complete concealment of the power supply system is provided. Hidden electrical wiring allows not only to create an aesthetic interior, but also to protect engineering communications from various damages.
However, this mounting option needs a careful approach. To hide the cable, you will need to additionally purchase corrugated pipes for electrical wiring. For each point (switch, socket) you will need to buy a special box that will secure the installed mechanism.
In places where utilities are laid, strobes are arranged in the walls. As soon as the wiring in a private house is fully completed, it is necessary to connect the wires to each other and check the operability of the system. And only after that a layer of plaster is applied.
open way
The open wiring diagram provides free access to the wires and every point of the system. In this case, the wire is placed in special plastic boxes, which, if desired, will fit perfectly into the interior. The connection of the electrical wiring is carried out by means of special bundles.
Safety
Electrical wiring in a private house should be placed in free access. All meters, sockets, shields and switches must be located away from gas appliances and in open areas.

Sockets must be mounted at a height of at least 300 mm from the floor level, and switches - at the level of the lowered hand. It is undesirable to install sockets in the toilet and bathroom. However, if such a need does arise, you will need to lay a separate line and high-quality cable insulation.
It is important to strictly follow the safety requirements. Installation of electrical wiring must be carried out in a completely de-energized room. It is necessary to follow the recommendations for the installation of the cable and make sure that it does not come into contact with metal structures.
Main steps
Do-it-yourself wiring must be carried out in series. The whole process consists of the following main steps:
- Drawing up a wiring diagram.
- Markup.
- Construction works.
- Cabling.
- Installation of lighting fixtures and sockets.
- Cable connections in a single system.
- Commissioning works.
Charting
Before you make electrical wiring, you need to develop drawings. This is required to determine the number of consumers of electrical energy and how to connect them. The scheme will allow you to find out the installation locations of all elements, the optimal distance between them, as well as the exact amount of consumables.

Drawings can be drawn up in any order, but it is desirable to comply with some requirements.
Powerful household appliances (boiler, electric stove, washing machine) must be grounded. To do this, you will need to install 3 wires for electrical wiring ("phase", "zero", "ground"). Separate lines for connecting lamps and sockets.
markup
In accordance with the project documentation, it is necessary to carry out marking work. Places for laying cables and installing sockets should be marked. At this stage, you can also study the features of providing other utilities (water supply, sewerage, heating, etc.).
Construction works
After marking, you should start drilling the walls. This is required for laying communications. Strobes are drilled - special channels in concrete or brick. These holes can vary in depth and size. In the absence of professional equipment for drilling strobes, you can use an ordinary chisel. But in this case, the process will take much longer. Therefore, it is advisable to use a perforator or grinder. To create holes for switches and sockets, you need to drill round recesses with a diameter of 80 mm.
Cabling
As mentioned above, do-it-yourself wiring can be done in two ways - closed and open. In the first case, the installation is carried out in the furrows under the plaster. Traditionally, such communications are created during the construction of the building. This option is used in the construction of houses to ensure maximum safety. But it is worth noting that this option is characterized by significant drawbacks - for example, they are difficult to access if it is necessary to additionally connect current receivers. Also, the cable with hidden wiring can be laid in the floor structure.

In the second case, wires for electrical wiring are laid openly on the surface of walls and ceilings. This option is more suitable for technical rooms and country houses.
Installation of lamps and sockets
Wiring equipment can be divided into several types - lamps, switches and sockets. All of them can belong to open or hidden wiring.
This equipment must be mounted on special sockets with a thickness of at least 10 mm and a diameter of 70 mm. Products must be made of materials that do not conduct current - textolite, plexiglass, wood. The boxes are installed in strobes and fixed with a gypsum mortar.
The top cover is removed from the switch, a cable is connected to the terminals with a margin of approximately 50-60 mm. To push the body of the product from the plates of spacer brackets into the box, it is necessary to dismantle the screws. Then they should be wrapped, the spacers should be moved apart for fixing in the installation device. To prevent the socket from being skewed, the screws must be tightened in turn. And finally, the cover is installed in place.

The switches are installed in the break of the "phase" wire leading to the lamp holder. In the event of a short circuit, this will allow you to de-energize the network as quickly as possible, and ensure safety when replacing lighting fixtures.
During installation, you need to ensure that the shutdown is carried out by pressing the top button. Sockets are connected in parallel with the main line of the electrical network.
Connecting the cable into a single system
The connection of the line into a single whole is carried out by means of special terminals. In order to further ensure convenient operation of electrical wiring and the possibility of disconnecting or connecting additional consumers, it is recommended to mark cable connections.

Commissioning works
Checking the health of the electrical network is one of the important points, as this will prevent many problems in the future. Commissioning includes the following steps:
- Visual inspection of the electrical installation for compliance with the requirements for electrical work and project documentation.
- Measurement of insulation resistance.
- Checking the presence of a circuit and the quality of the connection of grounding devices.
- Testing fixtures for installing fixtures and socket assemblies.
Connection Permission
The installation of the electrical wiring of the residential building is completed, the object is ready for power supply. The owner of electrical networks, on the basis of acceptance measures, draws up an act of admission to connection. In the process of acceptance measures, it is allowed to supply voltage to a new house on the basis of an agreement during the entire test period. To carry out these tests, you will need to contact the owner of the electrical networks to which the power supply is connected, with an application for a technical inspection and admission to connection. The following documents must be attached to the application:
- current technical specifications.
- Project documentation with all necessary approvals.
- Information about the installed electric energy metering devices.
- An act of operational responsibility of the parties and balance sheet ownership.
- Single line power supply.
If you decide to replace electrical networks, then you need to understand a few basic rules:
- Before installation, you need to draw a wiring diagram indicating the locations of switches, lighting fixtures, sockets, metering and protection devices for electrical energy.
- Replacing electrical wiring is not just wallpapering a room. It is desirable to carry out its installation as quickly as possible and at one time.
- It is important that the installation is carried out by qualified professionals.
- As a rule, wiring is replaced every 30-50 years, it all depends on the quality of the installation and the materials used. Therefore, in this case, it is not worth saving, this primarily concerns protective devices and cable products.
- For electrical wiring, it is desirable to use a copper cable. Despite the fact that, unlike aluminum, it is much more expensive, copper wire has excellent mechanical and electrical characteristics.